Aug 28, 2026
After two years of steady service, your vacuum cleaner starts sounding harsher. The suction drops, and occasionally you see a small spark through the vents. You open the motor housing and find two black blocks pressed against a copper-looking drum, one worn to half its original length. Those blocks are carbon brushes, and for most vacuum-cleaner motors they are the first wearing parts to check.
If the brushes are worn, replacing them is usually enough to restore pull and prevent motor damage. It is not a difficult repair, but you need the right part and a few precautions. This article explains what these brushes do, why they wear out, how to choose a replacement, and how to install it.
Carbon brushes in a vacuum cleaner are small components made from a carbon or carbon-graphite compound. They sit in brush holders on the motor's commutator and carry electrical current from the power supply to the rotating armature. Because the motor spins thousands of revolutions per minute, the brushes are engineered to wear slowly while the contact face slides against the commutator. That sliding contact is what transfers power to the winding; without brushes, the motor simply cannot run.
A typical vacuum brush assembly includes the carbon block, a spring or metal clip that presses the block against the commutator, and a braided copper lead that connects the brush to the circuit. Brush geometries vary. Some are rectangular with a curved face that matches the commutator radius, while others have a chamfered trailing edge for quieter operation. If you need a direct replacement, typical sets with correct spring pressure and terminal connectors are available in our vacuum cleaner carbon brushes product line.
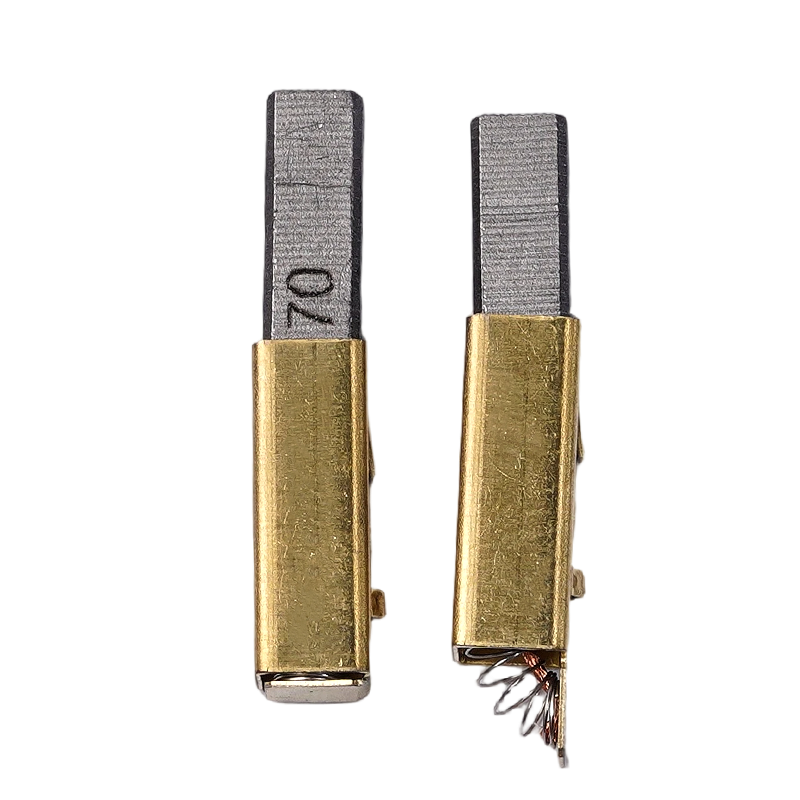 Vacuum Cleaner Carbon Brushes Suppliers, ManufacturersAs China vacuum cleaner carbon brushes manufacturers and suppliers, Jiangsu Hailing Carbon Products Co., Ltd. customize carbon brushes fo...View Product →
Wear is a normal part of brush operation. The brush must rub against a spinning commutator to do its job, and friction removes material with every rotation. What varies is the speed of that wear.
The main factors that accelerate wear are:
Under normal conditions, a pair of brushes can last for several hundred working hours. Heavy use, carpet powder, pet hair, or regular clogging can shorten that service life. This is why vacuum brushes are considered a consumable maintenance part, not a fit-and-forget component.
The table below describes common wear patterns and what they usually indicate.
| Wear symptom | Likely cause | Recommended action |
|---|---|---|
| Evenly worn short brush | Normal service wear | Replace both brushes |
| One brush much shorter than the other | Uneven spring pressure or holder friction | Inspect holder; replace both brushes |
| Black heavy sparking with soot | Commutator residue or worn brush | Clean commutator; replace brushes |
| Burned spots on the contact face | Overheating or armature fault | Check bearings and armature |
A vacuum usually gives plenty of warning before the brushes fail completely. The common signs are:
When you suspect brush wear, shut off the vacuum and unplug it. Remove the cover that exposes the motor, then lift each brush holder and measure the remaining carbon. If less than about a quarter of the original length is left, or if the contact face is chipped, cracked, or heavily pitted, it is time to replace them. Always replace the brushes in pairs, even if one side looks better than the other. Before starting any replacement, review the basic safety and handling points in our guide on matters needing attention when replacing carbon brushes.
Choosing a replacement for a vacuum cleaner carbon brush comes down to five things: dimensions, material, contact shape, spring style, and terminal configuration.
Dimensions are the first filter. A brush that is too wide will not fit the holder, while one that is too short may lose contact before the spring takes over. Measure length, width, and height with a caliper, and check the original part number if possible. Tolerances of about 0.1 mm matter because the brush must slide freely but not rattle.
Material affects durability and commutator wear. Most vacuum motors use a copper-graphite brush because it gives low electrical resistance and good lubricating properties. Other grades, such as electrographite, handle higher temperatures but may not suit every commutator. If you are not sure, match the material of the original brush or ask the supplier for the motor type.
Contact shape must align with the commutator radius. A curved face lets the brush sit on the drum over a larger area, reducing current density and sparking. On some motors the brush has a bevel at the trailing edge; install it with the same orientation as the original.
Spring style can be a coil, a leaf, or a constant-force spring. The important thing is that the spring keeps steady pressure on the brush as it shortens. Terminal types also vary, from spade connectors to soldered leads with a push-in clip. Using the wrong terminal may force you to modify the wiring, which is not ideal.
If the original replacement is discontinued, a cross-reference based on the motor model is the safest route. Our household appliance carbon brushes range includes many sizes and terminal styles that fit common vacuum motors, so it is worth checking there when the exact part number is not available.
 Household Appliances Motor Carbon Brushes Manufacturers, FactoryJiangsu Hailing Carbon Products Co., Ltd. is China household appliances carbon brushes manufacturers and factory, we offer OEM/ODM househ...View Product →
Replacement is a straightforward mechanical job if you work carefully. The basic procedure is:
During those first seconds, the brushes will bed in against the commutator. Expect a little sparking for a short time; if it continues, stop and check for a bent spring or wrong-size brush.
Several mistakes can turn a simple brush change into a motor failure. Do not use a brush that is close but not exact in size. A tight brush can jam in the holder, and a loose brush will bounce and arc excessively.
Do not ignore the commutator. If the copper surface is grooved or burnt, new brushes will wear quickly on the rough surface. A light cleaning with fine emery paper is acceptable, but do not reshape or undercut the mica unless you have the right tools and experience.
Check the brush springs. A stretched or weak spring does not hold the brush firmly against the commutator, causing sparking and faster wear. Replace the spring or the whole holder if it no longer provides consistent pressure.
Finally, remember that worn brushes are sometimes a symptom, not the root cause. If your vacuum still runs hot or sparks after fitting new brushes, inspect the armature, bearings, and motor ventilation. Replacing brushes without fixing the underlying problem wastes time and money.
Carbon brushes are a small part, but they directly affect the performance and life of a vacuum motor. Catching wear early, choosing the correct brush, and installing it carefully will keep a vacuum running reliably for years. For repair shops or facilities that maintain multiple units, keeping a few popular brush sizes in stock is a simple way to reduce downtime and shorten repair cycles.

Phone:
+86-183 6280 9971
+86-513 8277 2222
Email:
 Custom Motor Carbon Brushes Manufacturers


 English
 中文简体
中文简体